Citrix Cloud Connector STA Down


Issue:

Citrix NetScaler Gateway was reporting one of the STA Server is DOWN, The STA Servers in this case are Citrix Cloud Connectors maintained by Citrix.

The Citrix Cloud portal was reporting both Citrix Cloud Connectors are as online.

Checking the Event Viewer on the Citrix Cloud Connector reporting the issue I found continious events being written in the System log.

Attempted to re-run the binding command to link the Citrix Broker Service to the certificate as per: https://support.citrix.com/article/CTX221671/how-to-enable-ssl-on-cloud-connectors-to-secure-xml-traffic

When accessing the local Computers certificate, right-click, All Tasks and Manage Private Keys I get this:

But doing the same procedure on the working Cloud Connector I get:

Opening the certificate on the working and non-working server, both showed:

Resolution:

Exported the certificate from the working server including the Private Key

Imported the certificate onto the non-working server, it came in as an additional certificate but didnt look like the same so I removed it. Checked the properties of the non-working certificate and suddenly they were now working.

On the Citrix NetScaler both STA Servers are now online

The Citrix XML Service object was not found: 404 Not Found – Citrix Storefront and Cloud Connectors


Environment:

  • Citrix Storefront 1912
    • Store enabled for Domain Pass Through
    • Cloud Connectors configured as Delivery Controllers on HTTPS/443
  • Citrix Cloud Connectors

Issue:

When we were browsing to the Storefront URL it would do Domain Pass Thru, it logs in as the user but no apps or desktops available.

In Event Viewer it has 3 errors:

  1. Cloud Connector 1 is not available

“The Citrix XML Service object was not found: 404 Not Found. This message was reported from the XML Service at address https://<cloud_connector_1>/scripts/CtxIntegrated/wpnbr.dll. The specified Citrix XML Service could not be contacted and has been temporarily removed from the list of active services.”


2. Cloud Connector 2 is not available
“The Citrix XML Service object was not found: 404 Not Found. This message was reported from the XML Service at address https://<cloud_connector_2>/scripts/CtxIntegrated/wpnbr.dll. The specified Citrix XML Service could not be contacted and has been temporarily removed from the list of active services.”
 

3. All the Citrix XML Services configured for farm failed to respond to this XML Service transaction.
“All the Citrix XML Services configured for farm <name> failed to respond to this XML Service transaction.”

After around 10secs in Event Viewer

  1. Cloud Connector 1 is available

“The Citrix XML Service at address <cloud_conenctor_1>:443 has passed the background health check and has been restored to the list of active services.”

2. Cloud Connector 2 is available

“The Citrix XML Service at address <cloud_conenctor_2>:443 has passed the background health check and has been restored to the list of active services.”

If we refreshed the Storefront URL or browse again the above process repeats.
If we enabled the Store to do Username/Password auth we can log in fine and apps are there.

Resolution:

Within Storefront,

  • Select the Store experiencing the issue
  • Select Configure Store Settings
  • Select Kerberos Delegation
  • Select ‘Disable Kerberos Delegation’

As soon as Kerberos Delegation was disabled, Storefront Domain Pass Through continued to work, all applications were available and no errors in the Storefronts Event Viewer.

Citrix SDX VPX Migration


Date: 25 Sept 2020

I was recently involved in a project where 2 new Citrix ADC SDX’s were purchased and required to move the VPX’s off the old SDX’s to these new ones.

There are multiple approaches of moving VPX’s to new SDX hardware, some being:

  1. Re-create all of the VPX’s on the new SDX, copy over the required files (ns.conf, SSL certs etc), shut down the old VPX and power on the new VPX. This option is quicker but potentially a higher risk ensuring everything is working before powering down the old VPX and powering on the new VPX.
  2. Migrate service by service (VIP by VIP). This requires the new VPX’s to be created prior with new NSIPs. This option does give the ability to clean up the config while migrating over to the new VPX but can be very time consuming.
  3. HA failover method. This requires new VPX instances created on the new SDX hardware with new NSIPs and using HA to detach and reatach to move the VPX config and files.

For this project I went with Option 3, this wasn’t the quickest option nor the longest but for us it was the least disruptive and least riskiest to the business.

Step 1 – Provision new ADC SDX appliances with a like for like configuration with the existing SDX appliances. The new SDX appliances will need new SVM and XenServer IPs.

NOTE: Instance highlighted in Yellow below indicates the current Primary node serving traffic.

Step 2 – Provision new Primary VPX instance on new SDX #2, this new instance will need a new NSIP but don’t configure the SNIP. Set this new instance High Availablity Status to STAYSECONDARY, but because its a standalone instance it will be still a Primary instance.

Step 3 – On the existing SDX appliances, break HA on one of the HA pairs that are going to be migrated over to the new SDX. The previous Secondary node will now be a standalone Primary node.

NOTE: Set the old Secondary VPX node (which will now be a standalone Primary) High Availabilty Status to STAYSECONDARY.

Step 4 – On the current Primary node in Yellow, add the new VPX node on SDX #2 (which shopuld be configured as STAYSECONDARY) into HA. This will now change the status of the new VPX node to Secondary.

Ensure that HA Sync has completed successfully, HA Sync will sync over all of the VIPs from the Primary node, SNIP, Certificates and anything else on the Primary node.

Step 5 – Change the STAYSECONDARY High Availabilty Status on the now Secondary VPX node to ENABLED.

Perform an HA Failover making the Secondary node now become Primary, now all VIP traffic will be going through the new Primary node. Carry out normal testing to ensure that VIPs are working as expected. If there are any issues you can do another HA failover back to the existing Primary node while any issues are resolved. Because HA would have sync’d all of the VPX config/certs etc any issues are likely to be VPX or SDX networking issues.

Once everything has tested successfully, set the now Secondary node on the Old SDX #1 High Availability Status to STAYSECONDARY.

Shut down the old Secondary node on Old SDX #2

Step 6 – Provision a new VPX instance on the new SDX appliance #1. Set the new instance HA Status to STAYSECONDARY.

Now that all of the production traffic is going through the VPX on the new SDX appliance and tested successfully, break HA on the VPX pair.

Step 7 – On the Primary node, add the new VPX node on SDX #1 into HA. Ensure HA Sync has completed successfully.

Step 8 – Now that the new VPX pair are running on the new SDX appliance, the Secondary node on Old SDX #1 can be shut down.

If there are more VPX’s to migrate, follow the same process for each HA pair.

This process worked very well for us, zero down time for the business and we were able to move the VPX’s fairly quickly.

Citrix VDA / OS Matrix


Created: 13/04/2020

  • Updated: 24/04/2024 – Citrix VAD 2311 and 2402 LTSR
  • Updated: 19/10/2023 – Citrix VAD 2308
  • Updated: 21/04/2023 – All newer VDA Versions, and Windows Server 2022
  • Updated: 14/04/2020 – Win 2012 R2 Compatibility with VDA 1912 and 1912 LTSR
  • Updated: 25/09/2020 – Citrix VAD 2006
  • Updated: 18/11/2020 – Citrix VAD 2009

I have a project underway moving from Citrix XenApp 6.5 to Citrix Cloud, because this environment has applications that are only compatibile with certain Windows Operating Systems (possibily even Windows Server 2008 R2) we are going to have to build a multi-OS VDA environment.

I havent been able to find a matrix showing what VDAs support which Operating System, only whats in the Citrix docs for each OS release I decided to build a basic table showing the compatiblity. It might be useful for others in a similar situation as mine.


Windows ServerServer 2022Server 2019Server 2016Server 2012 R2Server 2012Server 2008 R2
Latest Build203481776314393960092007601
Support Status
MainstreamOct 13, 2026Jan 9, 2024Jan 11, 2022Oct 9, 2018Oct 9, 2018Jan 13, 2015
Extended SupportOct 14, 2031Jan 9, 2029Jan 12, 2027Oct 10, 2023Oct 10, 2023Jan 14, 2020
VDA for Server OS 
2402 LTSRXXX
2311XXX
2308XXX
2305XXX
2303XXX
2212XXX
2209XXX
2206XXX
2203 LTSRXXX
2112XXX
2109XXX
2106XXXX
2103XXXX
1912 LTSRXXX
1909XXX
1906XXX
1903XXX
1811XXX
1808XXX
7.15 LTSR XX

SDX 15000 Bundle Upgrade Fail


Update – 21/07/2020

Citrix have now released newer ADC SDX 11.1, 12.1 and 13.0 versions for the newer SDX hardware – https://www.citrix.com/downloads/citrix-adc/


Environment

Citrix ADC SDX 11.1 Build 61.112 (brand new appliance that came with 11.1 out of the box)

Issue

After uploading Bundle 13.0 Build 36.27 to the SDX, I attempted to upgrade the SDX appliance. According to article https://docs.citrix.com/en-us/citrix-hardware-platforms/sdx/supported-versions.html you can go straight from 11.1 to 13.0.

SDX_Bundle_Upgrade_Summary

The upgrade passes the ‘Upgrade initialization’ phase and after a short period of time it fails on the ‘Management Service upgrade’ with the follwoing error:

“Upgrade of Management Service to build-svm-13.0-36.27.tgz failed. Upgrade of Management Service should have rebooted the system but did not reboot even after 5 minutes. Manually reboot the Management Service. Restart Update Software operation. If problem persists contact Support.”

SDX_Management_Upgrade_Fail

Run the following:

  • shell
  • /var/log
  • more messagesSDX_Management_Upgrade_Fail_2

“Oct 23 13:30:09 <local0.err> <SDX Hostname> svm_event: 11.247.32.36 10/23/2019:00:30:09 GMT : SNMP TRAP_SENT : 127.0.0.1:BackupFailure:<SDX SVM IP> – Single Bundle Image was not found for SVM version 11.1-61.112
Oct 23 13:30:09 <local0.err><SDX Hostname>svm_event: <SDX SVM IP> 10/23/2019:00:30:09 GMT : EVENT BACKUPFAILED : 127.0.0.1:BackupFailure:11.247.32.36 – Single Bundle Image was not found for SVM version 11.1-61.112″

In the System > Events section it had the following event:

SDX_Management_Upgrade_Fail_3


Troubleshooting

  • Logged back into the SDX SVM, and rebooted the Management Service via UI and SSH, attempted another SDX bundle upgrade and got the same error message.
  • Rebooted the whole SDX appliance then attempted the SDX bundle upgrade and the same error again.
  • Attempted to upgrade to Bundle 12.1 Build 54.13, same issue
  • Attempted to upgrade to Bundle 11.1 Build 63.9, failed as the ‘platform’ version in this build is lower than the version I’m on, even though its currently at Bundle 11.1 Build 61.112
  • Factory reset on SDX2, no customizations done, attempted an upgrade to Bundle 13.0, same issue
  • After the above factory reset, checked out /var/log/messages

Oct 24 02:27:35 <user.notice> nssdx-mgmt installsvm: [2699]: BEGIN_TIME 1571884055 Thu Oct 24 02:27:35 2019
Oct 24 02:27:35 <user.notice> nssdx-mgmt installsvm: [2699]: VERSION svm-13.0-36.27.gz
Oct 24 02:27:35 <user.notice> nssdx-mgmt installsvm: [2699]: installsvm version (13.0-36.27) kernel (svm-13.0-36.27.gz)
Oct 24 02:27:35 <user.notice> nssdx-mgmt installsvm: [2699]: inside check_sysid_white_list, sysid_to_check = –450097–
Oct 24 02:27:35 <user.notice> nssdx-mgmt installsvm: [2699]: now reading sysid_white_list
Oct 24 02:27:35 <user.notice> nssdx-mgmt installsvm: [2699]: currentLine: 450093:2:0/1,0/2
Oct 24 02:27:35 <user.notice> nssdx-mgmt installsvm: [2699]: currentLine: 450087:2:0/1,0/2
Oct 24 02:27:35 <user.notice> nssdx-mgmt installsvm: [2699]: currentLine: 450092:1:0/1
Oct 24 02:27:35 <user.notice> nssdx-mgmt installsvm: [2699]: currentLine: 450096:2:0/1,0/2
Oct 24 02:27:35 <user.notice> nssdx-mgmt installsvm: [2699]: currentLine: 450089:2:0/1,0/2
Oct 24 02:27:35 <user.notice> nssdx-mgmt installsvm: [2699]: sysid=450097 NOT found in whitelist
Oct 24 02:27:35 <user.notice> nssdx-mgmt installsvm: [2699]: Error: This version of Management Service software is incompatible with the hardware platform 450097 , please contact Citrix support

  • Attempted to upgrade to Bundle v12.1 again, same GUI and ‘messages’ errors regarding the Management Service.

Oct 24 03:09:00 <user.notice> nssdx-mgmt installsvm: [4908]: BEGIN_TIME 1571886540 Thu Oct 24 03:09:00 2019
Oct 24 03:09:00 <user.notice> nssdx-mgmt installsvm: [4908]: VERSION svm-12.1-54.13.gz
Oct 24 03:09:00 <user.notice> nssdx-mgmt installsvm: [4908]: installsvm version (12.1-54.13) kernel (svm-12.1-54.13.gz)
Oct 24 03:09:00 <user.notice> nssdx-mgmt installsvm: [4908]: inside check_sysid_white_list, sysid_to_check = –450097–
Oct 24 03:09:00 <user.notice> nssdx-mgmt installsvm: [4908]: now reading sysid_white_list
Oct 24 03:09:00 <user.notice> nssdx-mgmt installsvm: [4908]: currentLine: 450093:2:0/1,0/2
Oct 24 03:09:00 <user.notice> nssdx-mgmt installsvm: [4908]: currentLine: 450087:2:0/1,0/2
Oct 24 03:09:00 <user.notice> nssdx-mgmt installsvm: [4908]: currentLine: 450092:1:0/1
Oct 24 03:09:00 <user.notice> nssdx-mgmt installsvm: [4908]: currentLine: 450096:2:0/1,0/2
Oct 24 03:09:00 <user.notice> nssdx-mgmt installsvm: [4908]: currentLine: 450089:2:0/1,0/2
Oct 24 03:09:00 <user.notice> nssdx-mgmt installsvm: [4908]: sysid=450097 NOT found in whitelist
Oct 24 03:09:00 <user.notice> nssdx-mgmt installsvm: [4908]: Error: This version of Management Service software is incompatible with the hardware platform 450097 , please contact Citrix support


Resolution

Just found out that the new SDX 15xxx ONLY support v11.1 build 61.112, the version it gets shipped with

https://docs.citrix.com/en-us/citrix-hardware-platforms/sdx/hardware-platforms/sdx-15000.html

“Citrix ADC SDX 15000 appliance is supported only on SDX image version 11.1.61.112 (private build).”


Citrix Workspace Service Setup


Going through my first Citrix Cloud/Workspace/CVAD deployment I thought I’d blog the process I go through to configure Workspace. This blog post will get updated as I go and discover more about Workspace.


After authenticating into your Citrix Cloud instance, browse to Workspace Configuration

Citrix_Cloud_Menu

Access

Enable the Workspae URL and then click Edit. Choose a relevant name for your Workspace URL, once it has been Save, it can take 10mins to become available as mentioned below.

Workspace_Config_URL

Authentication

Select the authentication method used to sign into Workspace. Configuration of each of these authentication methods is done via Identity and Access Management section.

Workspace_Config_Auth

Customize / Appearance

  • Upload your Sign-in Appearance logo
  • Upload your After Sign-in Appearance logo
  • Content Branding (colour scheme)

Customize / Preferences

Configure the following:

  • Allow Favourites (Enabled/Disabled)
  • Automatically Launch Desktop (Enabled/Disabled)
  • Workspace Timeout (20mins is default)
  • Citrix Workspace Preferences (In a browser / In a native app / Let subscribers choose)
  • Enabled Microsoft Teams (Enabled/Disabled)


Manage Services Integrations

By default, Virtual Apps and Desktops is enabled by default. To configure Workspace for an On Prem Virtual Apps and Desktops or XenApp 6.5 site, on ‘Virtual Apps and Desktop On-Premises Sites” click Add Site.

Will document the On Prem site connections later.

Workspace_Config_ServiceIntegration

Configure Workspace with On Prem ADC Gateway

Browse to Access, under the required Resource Location select Configure Connectivity.

Workspace_Config_Access_GW_Service

  • Click Edit and enter in the external FQDN of your On Prem ADC Gateway.
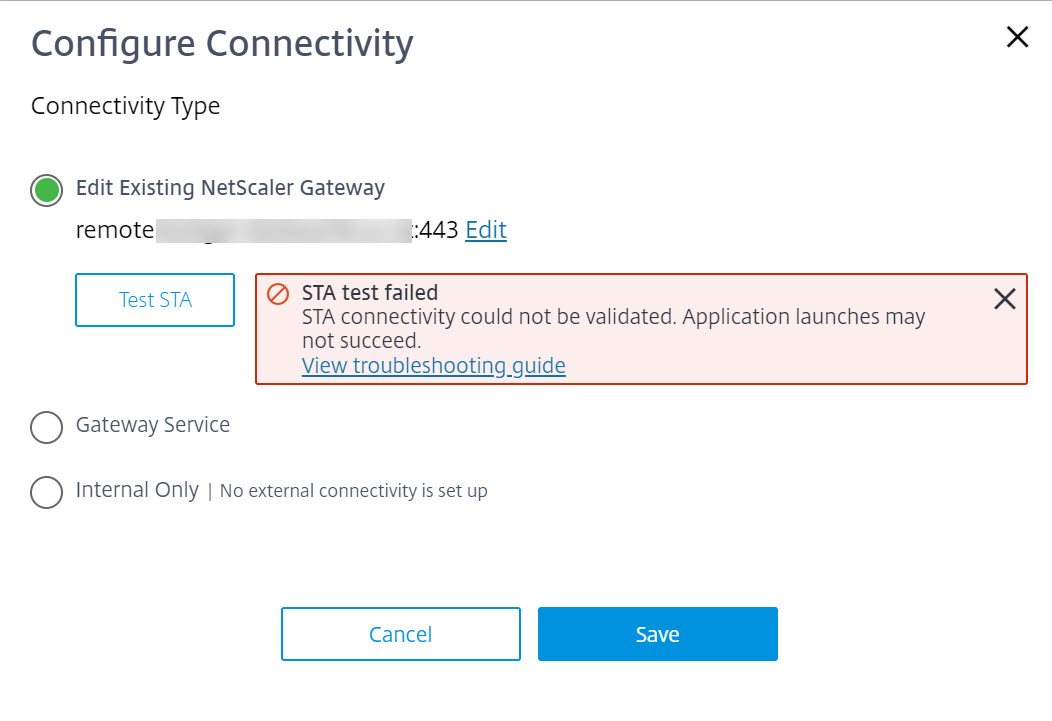
  • Select Test STA, this is likely to fail as they are behind the ADC Gateway
  • Click Save

Workspace_Config_Access_GW_Service

  • Under Access and your Resouce Location you should now see:
    Gateway: Gateway_FQDN:443

Workspace_Config_URL_Gateway

To validate the Citrix Gateway is now handling the ICA traffic via Citrix Workspace, log into your Citrix Gateway > select Citrix Gateway > ICA Connections

Citrix ADC_ICA Connections

Because the user authentication is handled by Citrix WorkSpace via the Citrix Cloud Connectors to Active Directory, the Citrix Gateway will show ‘anonymous’ as the username.

Workspace_Config_NetScaler_ICA_Conn

To validate that the Citrix Gateway is being used I SSH’d into the ADC and run:

  • shell
  • nstcpdump.sh host <Gateway VIP> or <Content Switch VIP> (if using Citrix Unified Gateway)

You will see hits on this once applications are launched from Citrix Workspace.

Citrix ADC Feature Matrix


Updated: 4 Aug 2020 (Platinum column)

I was looking for a simple breakdown of the Citrix ADC and what features you get with each license edition.

There are some from Citrix like: https://www.citrix.com/products/citrix-adc/platforms.html but it doesn’t really give a simple list of exact feature to license.

I decided to create my own matrix based on the Platinum, Enterprise and Standard license. Hope its useful for you also.

I have included the XLSX file in case you need it – NetScaler Licensing

Feature Platinum Advanced Standard
Web Logging YES YES YES
Surge Protection YES YES NO
Load Balancing YES YES YES
Content Switching YES YES YES
Cache Redirection YES YES NO
Sure Connect YES YES NO
HTTP Compression YES YES NO
Delta Compression NO NO NO
Priority Queuing YES YES NO
SSL Offloading YES YES YES
Global Server Load Balancing YES YES NO
GSLB Proximity YES YES NO
DoS Protection YES YES NO
Dynamic Routing YES YES YES
Content Filtering YES YES YES
Citrix Bot Management YES
Integrated Caching YES NO NO
SSL VPN YES YES YES
AAA YES YES NO
OSPF Routing YES YES NO
RIP Routing YES YES NO
BGP Routing YES YES NO
Rewrite YES YES YES
IPv6 protocol translation YES YES YES
Citrix Web App Firewall YES NO NO
Responder YES YES YES
x_HTML Injection YES YES YES
Citrix ADC Push YES YES NO
Web Interface YES YES YES
AppFlow YES YES YES
Cloud Bridge YES NO NO
ISIS Routing YES YES NO
Clustering YES YES NO
CallHome YES YES NO
AppQoE YES YES NO
Appflow for ICA YES YES NO
x_RISE YES YES NO
vPath YES YES
Front End Optimization YES YES NO
Large Scale NAT YES YES NO
RDP Proxy YES YES NO
Reputation YES NO NO
URL Filtering NO
Video Optimization YES
Forward Proxy YES
SSL Interception YES
Remote Content Inspection YES
Adaptive TCP YES
Connection Quality Analytics YES

Citrix Storefront 3.16 HTML5 and Receiver for Linux Issue


Fellow Citrix CTA René Bigler highlighted an issue in the IGEL Community Slack channel that when using Storefront enabled for ‘Use Receiver for HTML5 if local Recevier is unavailable’ it would automatically default to HTML5 and fail to launch the app/desktop.

20181031_105753

I did further testing to isolate exactly where the issue might lie. Here’s my testing and results carried out.

Environment
-Citrix XenApp 7.15 CU2
-Storefront 3.15 and 3.16
-IGEL OS 10.05.100
-Citrix Receiver 13.9.1 and 13.10.0

Test #1
-Storefront 3.15, Receiver Deployment Option: Install locally
-IGEL OS 10.05.100
-Citrix Receiver 13.9.1

Result: Logged into Storefront browser, launched XenApp desktop successfully using native Receiver

Test #2
-Storefront 3.15, Receiver Deployment Option: Install locally
-IGEL OS 10.05.100
-Citrix Receiver 13.10.1

Result: Logged into Storefront browser, launched XenApp desktop successfully using native Receiver

Test #3
-Storefront 3.15, Receiver Deployment Option: Use Receiver for HTML5 if local Recevier is unavailable.
-IGEL OS 10.05.100
-Citrix Receiver 13.9.1

Result: Logged into Storefront browser, launched XenApp desktop successfully using native Receiver

Test #4
-Storefront 3.15, Receiver Deployment Option: Use Receiver for HTML5 if local Recevier is unavailable.
-IGEL OS 10.05.100
-Citrix Receiver 13.10.1

Result: Logged into Storefront browser, launched XenApp desktop successfully using native Receiver

Test #5
-Storefront 3.16, Receiver Deployment Option: Install locally
-IGEL OS 10.05.100
-Citrix Receiver 13.9.1

Result: Logged into Storefront browser, launched XenApp desktop successfully using native Receiver

Test #6
-Storefront 3.16, Receiver Deployment Option: Install locally
-IGEL OS 10.05.100
-Citrix Receiver 13.10.1

Result: Logged into Storefront browser, launched XenApp desktop successfully using native Receiver

Test #7
-Storefront 3.16, Receiver Deployment Option: Use Receiver for HTML5 if local Recevier is unavailable
-IGEL OS 10.05.100
-Citrix Receiver 13.9.1

Result: Logged into Storefront browser, launched XenApp desktop, attempted to use HTML5 and failed

Test #8
-Storefront 3.16, Receiver Deployment Option: Use Receiver for HTML5 if local Recevier is unavailable
-IGEL OS 10.05.100
-Citrix Receiver 13.10.1

Result: Logged into Storefront browser, launched XenApp desktop, attempted to use HTML5 and failed

Issue

Issue appears to be with any Receiver for Linux version running on Storefront 3.16 (1808)

Workaround

If you are running Storefront 3.16 (1808) and the Receiver for Linux, ensure you have ‘Install Locally’ set rather than ‘Use Receiver for HTML5 if local Recevier is unavailable’ then your XenApp desktops/apps will launch.

image (1)


Error “This installation package could not be opened. Contact the application vendor to verify that this is a valid Windows Installer package” Installation success or error status: 1620.


Issue

Attempting to install an .msp file (in my case Citrix XenApp 6.5 RollUp7) it fails to install with the following error message.

Error Message

msp error

Troubleshooting Steps

  1. Run the msp with the verbose logging switch for example:

.\XA650W2K8R2X64R07.msp /L*v C:\Temp\RollUp7.log

2. Have a look in the C:\Temp\RollUp7.log file and you’re looking for the highlighted in red below “C:\Windows\Installer\d5c63.msi

Log File:

=== Verbose logging started: 30/05/2018 8:17:04 Build type: SHIP UNICODE 5.00.7601.00 Calling process: C:\windows\System32\msiexec.exe ===
MSI (c) (EC:F0) [08:17:04:901]: Font created. Charset: Req=0, Ret=0, Font: Req=MS Shell Dlg, Ret=MS Shell Dlg

MSI (c) (EC:F0) [08:17:04:901]: Font created. Charset: Req=0, Ret=0, Font: Req=MS Shell Dlg, Ret=MS Shell Dlg

MSI (c) (EC:10) [08:17:04:917]: Resetting cached policy values
MSI (c) (EC:10) [08:17:04:917]: Machine policy value 'Debug' is 0
MSI (c) (EC:10) [08:17:04:917]: ******* RunEngine:
 ******* Product: {1471A89F-8CAB-4C46-89AB-942432D1DD3D}
 ******* Action: 
 ******* CommandLine: **********
MSI (c) (EC:10) [08:17:04:917]: Machine policy value 'DisableUserInstalls' is 0
MSI (c) (EC:10) [08:17:05:057]: Cloaking enabled.
MSI (c) (EC:10) [08:17:05:057]: Attempting to enable all disabled privileges before calling Install on Server
MSI (c) (EC:10) [08:17:05:151]: End dialog not enabled
MSI (c) (EC:10) [08:17:05:151]: Original package ==> C:\windows\Installer\d5c63.msi
MSI (c) (EC:10) [08:17:05:151]: Package we're running from ==> C:\windows\Installer\d5c63.msi
MSI (c) (EC:10) [08:17:05:166]: Note: 1: 2276 2: 3: 75 
DEBUG: Error 2276: Database: . Codepage 75 not supported by the system.
1: 2276 2: 3: 75 
This installation package could not be opened. Contact the application vendor to verify that this is a valid Windows Installer package.
C:\windows\Installer\d5c63.msi
MSI (c) (EC:10) [08:17:05:213]: Note: 1: 1708 
MSI (c) (EC:10) [08:17:05:213]: Product: -- Installation failed.

MSI (c) (EC:10) [08:17:05:213]: Windows Installer installed the product. Product Name: . Product Version: . Product Language: . Manufacturer: . Installation success or error status: 1620.

MSI (c) (EC:10) [08:17:05:213]: MainEngineThread is returning 1620
=== Verbose logging stopped: 30/05/2018 8:17:05 ===


3.  Browse to C:\Windows\Installer\ folder (hidden protected OS folder) and rename the .msi to .old mentioned in the log file.

4. Re-run the .msp install

5. This time it will prompt for the original msi files, in my case it was the mps.msi

windows_installer

6. Browse to the original msi file where it may be and now the .msp file will install normally.

Citrix Receiver upgrade to 4.10 via Scripted Install – “Exit code is 1602 No Plugin found with UpgradeCode = {9FAB00CA-B032-4E4E-8D0C-E3B35802335D}”


Issue

When doing either a scripted upgrade of Citrix Receiver to v4.10.x from v4.x the installation fails.

A manual upgrade works as expected.

Upgrade Script example

.\CitrixReceiver.exe /noreboot /silent /includeSSON /ENABLE_SSON=Yes /EnableCEIP=false

TrolleyExpress.log file
C:\Users\<install user>\AppData\Local\Temp\CTXReceiverInstallLogs-20180524-160141\TrolleyExpress-20180524-160141

shows something similar to the following:

Error - CComponentManager::GetInstallStatus(598) - Installation NOT successful for 'XenApp Web Plugin', error: 1603.
Information - CComponentManager::GetInstallStatus(603) - Installation NOT successful for 'Citrix Receiver (DV)', it never fully tried to install, possibly due to issues.
Information - CComponentManager::GetInstallStatus(603) - Installation NOT successful for 'HDX Flash', it never fully tried to install, possibly due to issues.
Information - CComponentManager::GetInstallStatus(603) - Installation NOT successful for 'HDX Aero', it never fully tried to install, possibly due to issues.
Information - CComponentManager::GetInstallStatus(603) - Installation NOT successful for 'Authentication Manager', it never fully tried to install, possibly due to issues.
Information - CComponentManager::GetInstallStatus(603) - Installation NOT successful for 'Self Service Plug-in', it never fully tried to install, possibly due to issues.
Information - CComponentManager::GetInstallStatus(603) - Installation NOT successful for 'WebHelper', it never fully tried to install, possibly due to issues.
Information - CComponentManager::GetInstallStatus(645) - Created entry for RTME Plugin for reinstalling it if it was installed previously
Information - CComponentManager::GetInstallStatus(692) - Need to repaire plugin with UpgradeCode = {9FAB00CA-B032-4E4E-8D0C-E3B35802335D}
Information - CtxInstallHelpers::CInstalledClientPkg::FindInstalledClient(154) - No existing clients found with given upgrade code: {9FAB00CA-B032-4E4E-8D0C-E3B35802335D}
Information - CComponentManager::GetInstallStatus(704) - Repairs Receiver plugin with Product code = 
Information - CComponentManager::GetInstallStatus(713) - No Plugin found with UpgradeCode = {9FAB00CA-B032-4E4E-8D0C-E3B35802335D}
Information - CApp::SetExitCode(120) - Exit code is 1602 (called with 1603)
Information - CApp::Remove_Reg_Uninstall(1641) - CApp::Remove_Reg_Uninstall
Information - CApp::ExitInstance(1335) - Exit Code = 1602

“No Plugin found with UpgradeCode = {9FAB00CA-B032-4E4E-8D0C-E3B35802335D}”

Solution

  • None currently, it’s a known issue with Citrix for upgrading to v4.10.x and 4.11.x, it’s meant to be resolved in v4.12.x.
  • New installs and manual upgrades work as expected
  • Upgrading to v4.9.x LTSR and earlier works as expected.